Main

New Mavic Air is Awesome for Travellers and Bloggers

dji new drone


One major challenge avid videographers and photographers face when going out to take great aerial shots has to pack so many pieces of equipment in a bags. Often they have to pack several lenses, mounts, batteries, multiple cameras, trips and clutter of so many other accessories.

So you have to carry oversize bags to the field or leave some of the equipment at home. Older drone avec caméra embarquée pose the same challenge because some of them are big.

But leaving such equipment behind means, you miss the opportunity to take excellent overhead shots.

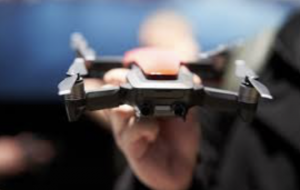
DJI Mavic Air is just compact enough to eliminate the portability problem. With this device, you will no longer have to compromise when going out to capture nature. The vast array of impressive onboard features will complete major aerial photography tasks as flawlessly as its high-end counterparts at a rather low price.

Features of the DJI Mavic Air

  • mavic air from DJIA 360-degree image capture angle with a complete sphere panorama mode
  • Smart picture is capturing controls allowing for ultra-responsive and active hand gestures. This lets you control the drone from a maximum of 33 feet away
  • 1/2.3 inch CMOS sensor with high sensitivity signature
  • 12.0MP High Definition effective pixels camera
  • HDR mode to support still photos
  • 30 fps and 720p live view feed using remote control or app
  • Flight time duration of a maximum of 21 minutes
  • Folds to about 6″ long, 3″ wide, and 2″ high
  • Speeds to maximum of 42.5 mph
  • 3-axis gimbal gyroscope
  • 4K UHD video support at 30 fps
  • Obstacle bypassing capabilities

Mavic Air the Pros

With a price tag of $799, this drone has a lot in common with the family member DJI Mavic Pro and its somewhat distant relative DJI Spark. Like those equally impressive models, Mavic Air comes with the following advantages to the benefit of the user.

1. It offers a wide array of overhead shooting modes allowing the user to diversify his shots
2. The device is compact enough to fit in a small bag and easy to carry around
3. It is handy for the aerial photography enthusiasts, beginners, and hobbyists
4. The new obstacle bypass technology makes the drone easier to use because it can steer itself from harms path
5. It is probably the most portable from DJI’s lineup of drones with a small battery and other accessories that make it much easier to transport
6. The design of the device shows smart design tweaks compared to the previous version. Sincerely most drones come out ugly and look like creepy flying bugs, but Mavic Air is a little cute to look at.

The Cons

Sadly, this drone’s limited creative options make it less appealing to avid photography professionals. It just doesn’t live up to the more demanding stuff of drone photographers.

The idea of incorporating two different USB connection options doesn’t make sense. It uses USB Type-C port when transferring footages but uses the Micro USB to charge. It is odd.

Bottom Line

It is a drone I can easily recommend to anyone who wants to take superior aerial images and filming modes without possessing extensive drone skills. Although the drone is a little overpriced ($799!!), it is still the most robust device ever to come from DJI. If you are looking for a mini drone pas cher, watch this video!

Tips For Better Travel Photography

In order to make your photos look great, you need to use the right techniques and tips. Here are a few suggestions: Composition, Shutter speed, and Blue Hour. All of these will help you create images that show the beauty of your location. You can use these techniques to take amazing photos that will amaze your friends and family.

Composition

In addition to focusing on the subject of the shot, you should also pay attention to the foreground and background elements of the photo. Foreground elements draw the viewers’ attention to the image, and they also add perspective and energy. In travel photography, foreground elements can be flowers, streets, buildings, or even ripples in the sand. The foreground elements should be in the bottom third of the photo.

Composition is an important part of any photograph, and it can make or break the overall look. The right amount of light and dark can greatly enhance the quality of your travel pictures. Whether the light is natural or artificial, the balance between light and dark is essential. Trial and error can help you achieve the best balance.

Tips for better travel photography

Colors

While traveling, look for colorful destinations and items to photograph. Photos with strong colors are sure to capture the mood of a destination and evoke memories of the experience. Use colorful buildings, cars, bikes, scooters, and more to create unique and interesting images. You can also find colorful clothing in local markets to make your vacation photos stand out. Bright colors are a great way to add life to pictures taken on a gloomy day.

When taking pictures, you can also take advantage of the Rule of Thirds, which is a simple compositional principle that divides an image into nine equal squares. Breaking the image up into these equal parts will give you a more balanced composition. Try to position your subject along these lines, not in the center of the image.

Shutter speed

When it comes to travel photography, shutter speed is an important aspect to consider. Generally, you should try to shoot at a shutter speed of 1/60 second or higher. This will allow you to let more light into the scene. If you shoot at a slower shutter speed, you may notice blurry images.

Shutter speed is one of the easiest settings to change on your camera. Generally speaking, a slower shutter speed is only recommended for subjects that do not move very quickly. In addition, modern cameras are able to determine the white balance of the image, but most people prefer to fix it in post-processing.

Blue Hour

In order to capture the perfect Blue Hour photos, it’s vital to know where to find the best light conditions. Blue hour only happens a few hours a day, and light conditions can change quickly. This means you have to plan your shots carefully and be willing to experiment with different camera settings.

The sky turns a deep blue during this time of day, allowing the lights of harbourside restaurants to gleam against the backdrop of a darkening sky. This atmospheric time of day makes for great photos. Here are some tips to make the most of this magical time.

Observe the scene

In travel photography, it is important to observe the scene as it is unfolding. Travel photography requires that the photographer is quick and decisive to capture the scene as it unfolds. The photographer must not use the auto-focus or the maximum fps on his camera, but should use artistic and technical skills to read the scene, analyze the lighting, and assess the camera settings.

Observing the scene helps the photographer get a better perspective and creates more compelling images. To achieve this, the photographer should walk around the scene while taking the picture. In addition, he or she should also consider the focal length of the lens.

Get your subject ready

Before you start shooting a photo, make sure the background is in focus. This is especially important when you are taking travel photos. Many photographers tend to focus on the subject in their photos and forget about the background. Often, they will ignore or block off famous photography locations. Others may ignore signs that say the area is closed off to the public, or they will even yell at people who appear in their shots.

The best travel photographers use various tools to help them form a shot list. They also make use of social media and Google Maps to get ideas for a particular shot. In addition, they know how to compose their shots, which can make all the difference. Using the proper composition can save you from cropping out details that don’t belong in the frame.

Follow this photography blog to learn more tips!

The best Coffee Shops to smoke in Amsterdam

Here’s a mini-guide selecting the most reputable Coffee Shops in Amsterdam to smoke in peace.

Visit Amsterdam, its canals, bridges, bicycles… and coffee shops! It has been 41 years – since 1976 – since the Netherlands, the first country in the world to decriminalize the use of cannabis. We have selected for our readers a list of the most reputable coffee-shops if you go to Amsterdam.

Things to know about Amsterdam’s Coffeeshops

In recent years, the public authorities have been trying to limit the number of coffee shops and thus reduce locals and tourists’ possibility to smoke freely in Amsterdam.

As such, the sales conditions for coffee shops are drastic:

No double cannabis/alcohol license: you can only sell one or the other,
Prohibition to sell hard drugs (cocaine, heroin, LSD, etc…),
All advertising is prohibited,
Prohibition to sell to minors,
Individuals must not possess more than 5 grams (sale for personal consumption only).

Even if you are not a heavy smoker, try it at least once if you go to Amsterdam, but ask the budtenders (the people who are allowed to sell cannabis) for advice; they will be happy to give you information pass it on. Their knowledge! Using vaporizers like the famous Crafty vaporizer (tested here) can help if you are not a tobacco person.

These are the places where you can smoke cannabis discreetly, inside a coffee-shop:

-The Dolphins
Address: Kerkstraat 39, 1017 GB Amsterdam, The Netherlands

A trip to Atlantis? No. It is a coffee-shop decorated in the way “Twenty Thousand Leagues Under the Sea.” A few hundred steps from the Leidseplein, we dive into the world of dolphins. This coffee-shop counts between €10 and €15 per gram to taste a small Dolphin Diesel, a Haze, a Kandy Kush, or a Northern Lights. You can also choose between four types of Moroccan hashish and one from Afghanistan.

-The Coffee-shop Club Media
Address: Gerard Doustraat 85, 1072 VN Amsterdam, The Netherlands

best places to smoke weed in Amsterdam

Here is a peaceful coffee-shop in the Pijp district where the emphasis is placed on hospitality, public welcome, and the quality of the products on offer. You will choose about fourteen varieties of hashish from 5 € to 60 € per gram and 19 types of weed. You will find the famous Super Skunk, the Kandy Kush, or the Blueberry for the Indica. As far as Sativas are concerned, the customer has the choice: Amnesia Haze, Super Silver Haze, Mango Haze… The place is a guarantee of a calm “fauna” with a good atmosphere.

-Amnesia
Address: Herengracht 133I, 1015 BG Amsterdam, The Netherlands

It will be easy to find it on the edge of the pretty Prinsengracht canal and a stone’s throw from the Grey Area: use your sense of smell. The closer you get to it, the more pungent the smell of weed in the surrounding streets. You can have a bite to eat – smoking cannabis often makes you hungry – but here, too, the menu has more weed and hashish than ready-made meals. The amnesia doesn’t cure customers’ disinhibition on a tight budget, but when you love, you don’t count!

-Barney’s Coffee-shop
Address: Haarlemmerstraat 102, 1013 EW Amsterdam, The Netherlands

Here is a very famous den for locals and onlookers. Despite four people’s inflated service, the wait at the counter is often long, and the room is crowded. You have to be patient, but it’s worth it: at Barneys’, they serve Utopia Haze and G13 Haze. Their herbs are known to be very powerful: less regular consumers, beware of the euphoric effects! The establishment is open every day from 9 am to 1 am.

Other reputable coffee-shops

To smoke in Amsterdam, you would need a complete guide to reference all the coffee shops. Nevertheless, here are a few to continue your smoking marathon:

The Siberia at 11, Brouwersgracht
The Green House Namaste at 345 Waterlooplein
The original Dampkring at 29, Handboogstraat (a symbolic place in Amsterdam since it was chosen to shoot a scene from the movie Ocean’s Twelve)
The Bulldog (The First) at 90, Oudezijds Voorburgwal
The Kadinsky at 9, Rosmarijnsteeg
The Abraxas at 12-14, Jonge Roelensteeg
The Baba at 130, Barentszstraat